
Sukhasana
1. Introduction to Sukhasana:
Sukhasana, commonly known as the Easy Pose, is a foundational seated yoga posture that forms the basis for many meditation and pranayama practices. The name "Sukhasana" is derived from two Sanskrit words: "Sukha," meaning ease or comfort, and "Asana," meaning pose. This asana is characterized by a comfortable and cross-legged seated position, promoting a sense of groundedness and relaxation.
2. Getting into Sukhasana:
To practice Sukhasana, start by sitting on the mat with legs extended. Bring one foot in toward the groin and then the other, allowing the knees to drop out to the sides. The feet are positioned beneath the opposite knee, creating a comfortable and symmetrical cross-legged posture. The spine remains straight, and the hands can rest on the knees or in a mudra of choice. Sukhasana is accessible to practitioners of all levels, making it a versatile and widely practiced pose
3. Alignment and Posture:
In Sukhasana, proper alignment is key. The weight is evenly distributed across the sitting bones, promoting a stable foundation. The spine elongates, and the shoulders relax away from the ears. The chin is parallel to the ground, and the hands may rest in the lap with the palms facing up or down. This alignment allows for an open chest and a natural flow of energy throughout the body.
4. Benefits of Sukhasana:
Sukhasana offers a myriad of physical, mental, and emotional benefits. Physically, it stretches and strengthens the back, hips, and knees. The pose also promotes good posture and can alleviate discomfort associated with prolonged sitting. On a mental and emotional level, Sukhasana creates a calm and centered state of mind, making it an excellent choice for meditation and mindfulness practices.
5. Opening the Hips:
One notable aspect of Sukhasana is its capacity to gently open the hips. As the knees drop to the sides and the pelvis settles into the mat, the hip joints are encouraged to release tension. This makes Sukhasana a preparatory pose for deeper hip-opening asanas and contributes to increased flexibility over time.
6. Grounding Energy:
Sukhasana is often considered a grounding pose. By establishing a connection with the earth through the sit bones and the crossed legs, practitioners may experience a sense of stability and rootedness. This grounding quality can be particularly beneficial for individuals seeking to find balance and tranquility in both body and mind.
7. Meditation and Sukhasana:
One of the primary applications of Sukhasana is as a meditation seat. The comfortable and stable nature of the pose makes it conducive to extended periods of meditation. Practitioners can focus on the breath, cultivate mindfulness, and explore the depths of their inner experience while sitting in Sukhasana.
8. Breath Awareness in Sukhasana:
The natural alignment of Sukhasana allows for ease in breath awareness. As the spine is straight and the chest open, the breath flows freely and can be observed with mindfulness. This integration of breath awareness enhances the meditative aspect of Sukhasana, fostering a sense of presence and relaxation.
9. Modifications for Comfort:
Sukhasana is generally comfortable for many, but practitioners with tight hips or discomfort in the knees may find it challenging. In such cases, props like cushions or blankets can be placed under the sit bones to provide elevation and support. This modification allows individuals to experience the benefits of Sukhasana without strain.
10. Precautions and Contraindications:
While Sukhasana is accessible for most, individuals with severe knee or hip injuries may need to exercise caution. It's advisable to consult with a yoga instructor or healthcare professional for personalized guidance. If discomfort arises during the pose, modifications or alternative seated postures can be explored.
11. Incorporating Sukhasana into a Routine:
Sukhasana can be practiced as a standalone pose or integrated into a broader yoga routine. It serves as an excellent starting point for pranayama practices, seated meditation, or as a transitional pose between more dynamic sequences. Its versatility makes it a valuable addition to both beginners' and advanced practitioners' yoga repertoires.
12. Cultivating a Mindful Presence:
Beyond its physical and meditative benefits, Sukhasana encourages the cultivation of a mindful presence. Whether used as a daily meditation seat or a moment of repose in a busy day, this pose invites individuals to connect with the present moment, fostering a sense of inner peace and tranquility that extends beyond the boundaries of the yoga mat.

Vrksasana
1. Introduction to Vrksasana (Tree Pose):
Vrksasana, commonly known as Tree Pose, is a balancing yoga posture that symbolizes strength, stability, and the grounding qualities of a tree. The Sanskrit term "Vrksa" translates to tree, and this pose embodies the graceful and steady nature of a tree swaying in the wind. Tree Pose is a fundamental standing pose that encourages both physical and mental balance.
2. Starting in Tadasana:
Begin by standing in Tadasana (Mountain Pose) with the weight evenly distributed on both feet. Find a focal point, a Drishti, in front of you to aid in balance and concentration. Take a few deep breaths to center yourself and establish a connection with the ground.
3. Weight Distribution and Foot Placement:
Shift your weight to your left foot and root it firmly into the ground. Slowly lift your right foot, bending the knee, and place the sole against the inner left thigh or calf. Avoid placing the foot directly on the knee to protect the joint. Find a position that feels comfortable and maintains the integrity of the pose.
4. Engaging the Standing Leg:
Engage the muscles of the standing leg, especially the quadriceps and glutes, to create a stable foundation. The knee of the standing leg should be slightly bent, not locked, to facilitate balance and prevent strain.
5. Aligning the Hips and Shoulders:
Ensure that your hips remain level and facing forward. This alignment promotes a stable base and prevents unnecessary strain on the lower back. Square your shoulders over the hips, maintaining a tall and elongated spine.
6. Hands in Namaste or Raised Position:
Bring your hands into a Namaste (prayer) position at the heart center or extend your arms overhead, palms facing each other. The choice of arm position can vary based on personal preference and the level of challenge desired.
7. Drishti and Concentration:
Maintain a steady Drishti (gaze) on your chosen focal point. This helps in enhancing concentration and balance. The focused gaze also calms the mind, fostering a meditative quality within the pose.
8. Slight Pelvic Tilt for Stability:
To further enhance stability, engage your core muscles and initiate a slight pelvic tilt. This action helps align the spine and prevents overarching in the lower back.
9. Variations for Different Levels:
Vrksasana offers variations to accommodate different skill levels. Beginners may keep the toes on the ground for support, while advanced practitioners can explore more challenging variations, such as closing the eyes or incorporating a standing backbend.
10. Breathing and Relaxation:
Maintain a steady and rhythmic breath throughout the pose. The breath serves as an anchor, supporting focus and relaxation. Avoid holding the breath, and instead, let it flow naturally.
11. Challenges and Overcoming Wobbling:
It's common to experience wobbling or instability, especially when initially practicing Tree Pose. Embrace the wobbles as a natural part of the learning process. Focus on your breath, gently bring the foot back to the ground if needed, and then attempt the pose again.
12. Closing the Pose Mindfully:
To exit Vrksasana, slowly lower the lifted foot to the ground with control. Return to Tadasana, take a moment to acknowledge the sensations in your body, and observe any changes in your sense of balance and stability. Practicing Tree Pose regularly not only strengthens the physical body but also cultivates a sense of inner resilience and rootedness, mirroring the enduring qualities of a tree in the face of life's challenges.

Facing Dog
1. Introduction to Downward Facing Dog:
Downward Facing Dog, or Adho Mukha Svanasana in Sanskrit, is a foundational yoga pose that combines elements of both a forward bend and an inversion. It is a fundamental posture often found in various yoga sequences, serving as both a transitional and grounding pose.
2. Starting Position:
Begin Downward Facing Dog from a tabletop position with hands directly beneath the shoulders and knees beneath the hips. Spread the fingers wide, tuck the toes, and lift the hips toward the ceiling, straightening the legs. The body forms an inverted V shape.
3. Alignment of the Spine:
One of the key aspects of Downward Dog is the elongation of the spine. The practitioner aims to lengthen the entire back, from the tailbone to the crown of the head, creating space between each vertebra. This alignment encourages a sense of extension and decompression in the spine.
4. Weight Distribution:
The weight is evenly distributed between the hands and feet. The hands press firmly into the mat, and the heels reach toward the ground. This balanced distribution supports stability in the pose and provides a gentle stretch to the calves and hamstrings.
5. Stretching the Back of the Legs:
Downward Facing Dog is effective in stretching the entire posterior chain, including the calves, hamstrings, and the muscles along the spine. The inverted nature of the pose allows for a deep release of tension in the back body.
6. Opening the Shoulders:
The shoulders are actively engaged in Downward Dog. The shoulder blades draw together, creating stability in the upper back. This engagement helps to open the chest and create space in the shoulder joints, promoting better posture.
7. Extending the Arms:
The arms are straight and strong, with the inner elbows facing each other. This extension of the arms supports the weight of the body and allows for a broadening of the upper back. The hands remain shoulder-width apart, fostering a sense of balance.
8. Downward Dog as a Transitional Pose:
Downward Facing Dog is often used as a transitional pose, linking various sequences in a yoga practice. It provides a moment of rest and realignment, allowing practitioners to catch their breath and transition smoothly between standing and seated postures.
9. Core Engagement:
The engagement of the core muscles is essential in Downward Dog. Drawing the navel toward the spine helps to stabilize the entire torso and supports the elongation of the spine. This activation contributes to the strengthening of the abdominal muscles.
10. Inversion Benefits:
Downward Dog is considered an inversion, as the head is positioned below the heart. This inversion provides benefits such as increased blood flow to the brain, a mild energizing effect, and a sense of rejuvenation. It is a gentle introduction to inversions for yoga practitioners.
11. Modifying for Comfort:
Practitioners with wrist sensitivity or tight hamstrings can modify Downward Dog. For wrist comfort, the hands can be placed on yoga blocks or fists. To address tight hamstrings, the knees may be slightly bent, gradually working towards straightening the legs over time.
12. Ending the Pose:
To release from Downward Dog, the practitioner can either transition to a different pose or move into a resting position, such as Child's Pose. Slowly lower the knees to the mat, allowing the body to return to a tabletop position. This controlled release ensures a smooth transition out of the pose, promoting mindfulness and awareness in the practice.

Wall Pose:
1. Introduction to Wall Pose:
Wall Pose, also known as "Adho Mukha Vrksasana" or Handstand, is an advanced inversion that involves balancing the body upside down with the support of a wall. It challenges both strength and balance, requiring a combination of core stability, shoulder strength, and proper alignment.
2. Preparing for Wall Pose:
Begin by placing a yoga mat perpendicular to the wall. Kneel in front of the mat with your palms about a foot away from the wall. Fingers should be spread wide for stability, and hands positioned shoulder-width apart. Kick one leg up towards the wall, with the other leg following to meet it.
3. Alignment of the Hands:
Proper hand placement is crucial in Wall Pose. The hands should be planted firmly on the mat, and the fingers spread wide to create a stable base. The weight of the body is distributed evenly across the palms, ensuring balance and control.
4. Engaging the Core:
As you kick up into Wall Pose, engage the core muscles to maintain a straight line from the wrists to the hips. This activation stabilizes the entire torso and helps in achieving a controlled and balanced handstand.
5. Finding the Wall:
Use the back leg to gently push against the wall, allowing the feet to come to rest on the wall. The heels may lightly touch the wall, providing additional support. This position allows practitioners to focus on alignment, balance, and gradually build strength for a freestanding handstand.
6. Shoulder Alignment:
Proper shoulder alignment is essential for stability and safety in Wall Pose. The shoulders should be stacked directly above the wrists, and the upper back engaged. This alignment helps prevent unnecessary strain on the shoulders and promotes a strong foundation.
7. Hips Over Shoulders:
Aim to align the hips directly over the shoulders, creating a vertical line. This alignment is crucial for balance and control in Wall Pose. Engage the muscles around the hips to maintain a straight and stable position.
8. Gazing Point:
Fix your gaze on a point between your hands or slightly in front of them. A focused gaze helps with balance and concentration, aiding in the development of a steady and controlled Wall Pose.
9. Balancing Effort and Relaxation:
While Wall Pose demands significant strength, it's equally important to find a sense of ease and relaxation within the pose. Consciously relax the neck and facial muscles, allowing the breath to flow steadily. This balance between effort and relaxation contributes to a more sustainable and enjoyable practice.
10. Gradual Progression:
Wall Pose is an advanced inversion, and progress may take time. Start with short holds, gradually increasing the duration as strength and confidence develop. Consistent practice, patience, and a mindful approach are key to mastering this challenging pose.
11. Safety Considerations:
Practitioners should be cautious and avoid forcing themselves into Wall Pose. Those with wrist, shoulder, or neck issues should consult with a yoga instructor or healthcare professional before attempting this pose. Using the support of a spotter or practicing against a padded surface can enhance safety.
12. Exiting Wall Pose:
To exit the pose, gently lower one leg at a time, bringing both feet back to the mat. Take a moment in Child's Pose or another resting position to restore energy and release any tension. Exiting mindfully ensures a safe conclusion to the practice and promotes a positive experience with Wall Pose.

Baby Pigeon
Benefits
Pigeon pose specifically works as a hip opener and forward bend, stretching your thighs, groin, back, piriformis, and psoas. The leg extended to the rear gets a stretch of the psoas and other hip flexors. On the other side, the rotators and outer hip are stretched. It is a good antidote to sitting for long periods. It prepares you for seated postures and backbends.
Step-by-Step Instructions
1.Bend your right knee and bring that leg forward as if you were going to step into a lunge. Instead of placing your foot down as you would for a lunge, bring your right knee to the floor on the outside of your right hand. The right shin may angle back towards the left hip or be more parallel to the front of your mat, depending on your range of motion.
2.Release your left knee to your mat. Your left leg should be flat on the floor. Take a look backward and make sure that your left foot is pointing straight back.
3.Keep hips square and weight balanced equally on both sides as best you can. If this feels too intense, place a blanket or block or under the hip or back knee. Reach your forehead toward the floor.
Common Mistakes
1.Rotated Rear Leg
Your rear leg should be in a neutral position rather than rotated outward. To correct this, tuck your toes under and lift your thigh to adjust so your hips are square.2.Hips Not Square
Don't collapse onto the hip of the front bent knee. Keep your hips square, propped with padding as needed.Modifications and Variations
You can tailor the Pigeon pose to best fit your body by following these strategies. Work on getting a deeper stretch or keep it more modest—whatever works best for your body.
To make this more comfortable (and more effective) for a beginner, you can take a few extra steps and precautions. Check the hip of the leg that is bent in front of you. If the hip doesn't touch the floor, be sure to take adequate padding under the butt on that side. If necessary, use several blankets or a block. It's important to evenly distribute your weight between both hips and keep them square toward the ground. Otherwise, you will be placing stress on the knee and twisting your sacrum.
How to Prepare
Eye of the Needle Pose is one of the best preparatory postures you can do for Pigeon Pose, especially if you have tight hips. Lie on your back with your knees bent and feet on the floor and find a neutral spine. Lift one foot and cross the ankle on the opposite thigh, just above the knee. Interlace your hands behind the back of the opposite thigh and exhale as you draw both legs in closer to your chest. Hold for five breaths and repeat on the other side.
Safety and Precautions
Avoid this pose if you have any knee injury or hip issues.6 You should not feel any stress on the knee. You will feel rotation of your femur in the hip socket and a great stretch along the front of the hip, but it should not be painful.
Frequently Asked Questions
As a hip opener, Pigeon Pose stretches the outer hip, thigh, groin, and back, and also the piriformis, and psoas muscles. The extended leg also receives a hip flexor stretch.3
Who should avoid Pigeon pose?
Those with knee, hip, or back issues may want to avoid Pigeon pose, and it may be uncomfortable in later stages of pregnancy. As with all yoga poses, any pose that causes physical discomfort or pain should be stopped immediately and avoided or modified.
How can you ease into Pigeon pose?
Work your way into Pigeon Pose by placing a folded blanket or block underneath your seat for support. Hold the posture with an upright torso instead of folding forward. If this is still not accessible to you, lie on your back and perform Eye of the Needle Pose instead.

Balasana (Child's Pose):
1. Introduction to Balasana (Child's Pose):
Balasana, commonly known as Child's Pose, is a restorative yoga pose that provides a gentle stretch to the back, hips, thighs, and ankles. It is often used as a resting position during yoga practice, offering a moment of repose and introspection.
2. Starting Position:
Begin in a tabletop position, with wrists directly under the shoulders and knees beneath the hips. From here, gently sit back onto your heels, allowing the torso to fold forward between the thighs.
3. Hip Placement and Relaxation:
Balasana involves sitting back on the heels, which encourages a passive stretch in the hips. The pose allows the hips to sink towards the heels, promoting relaxation and release of tension in the lower back and hips.
4. Lengthening the Spine:
While in Child's Pose, extend the arms forward with the palms resting on the mat. Simultaneously, lengthen the spine by reaching the crown of the head forward, creating space between the vertebrae.
5. Forehead to the Mat:
Rest the forehead on the mat, allowing the neck and shoulders to relax. This forward folding action contributes to a soothing and calming effect on the nervous system.
6. Focusing on the Breath:
Balasana provides an opportunity to focus on the breath. The deep inhalations and exhalations help to calm the mind and release any accumulated tension, making it an excellent pose for stress relief.
7. Child's Pose as a Transitional Pose:
Child's Pose is often used as a transitional pose during more dynamic yoga sequences. It allows practitioners to regroup, catch their breath, and reconnect with their breath and intentions before moving on to the next set of poses.
8. Heart Opening Variation:
A variation of Child's Pose involves extending the arms backward alongside the body with the palms facing up. This variation opens the chest and shoulders, providing a gentle stretch to the upper body.
9. Balasana for Back Pain:
Child's Pose is recommended for individuals experiencing back pain. The gentle stretch and elongation of the spine in this pose can alleviate discomfort and tension in the lower back.
10. Counteracting Inversions:
Child's Pose is often used as a counterpose to more strenuous or inverted postures. It allows the spine to return to a neutral position, counteracting the effects of backbends or inversions.
11. Modifying for Comfort:
Individuals with tight hips or knees may find it more comfortable to place a cushion or folded blanket between the thighs and calves in Child's Pose. This modification accommodates various body types and enhances the overall experience of the pose.
12. Closing Child's Pose:
To exit Child's Pose, gently walk the hands back towards the body, lifting the torso back to a tabletop position. This controlled transition helps prevent dizziness and allows practitioners to maintain a sense of mindfulness and presence as they move on to the next phase of their practice.
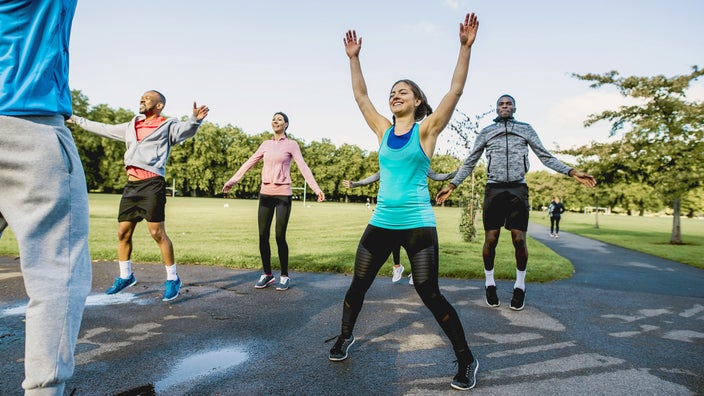
Jumping Jacks
1. Introduction to Jumping Jacks:
Jumping jacks are a classic and dynamic exercise that combines cardiovascular conditioning with full-body engagement. This exercise is often used in warm-up routines, high-intensity interval training (HIIT), and as a quick way to elevate the heart rate.
2. Starting Position:
Begin by standing with your feet together and arms at your sides. This is the starting position for jumping jacks.
3. Opening Movement:
In one fluid motion, jump your feet out to the sides while simultaneously raising your arms overhead. This movement engages the lower body and raises the heart rate.
4. Arms Extended:
At the top of the jump, your feet should be shoulder-width apart, and your arms fully extended overhead. This position maximizes the range of motion and intensifies the cardiovascular benefits.
5. Return to Starting Position:
Jump back to the starting position by bringing your feet back together and lowering your arms to your sides. This completes one repetition of the jumping jack.
6. Repetition and Pace:
Jumping jacks are typically performed in a rhythmic and continuous manner. The exercise can be adapted to different fitness levels by adjusting the pace, making it suitable for both beginners and advanced individuals.
7. Cardiovascular Benefits:
Jumping jacks are highly effective for cardiovascular conditioning. The repetitive and rhythmic nature of the exercise elevates the heart rate, improving cardiovascular endurance and promoting overall heart health.
8. Full-Body Engagement:
This exercise engages multiple muscle groups simultaneously. The lower body works to jump and land, while the arms are involved in the upward and downward movement. The core also plays a role in stabilizing the body.
9. Caloric Expenditure:
Jumping jacks contribute to caloric expenditure, making them an efficient choice for those looking to burn calories and lose weight. The combination of aerobic and strength elements enhances the overall metabolic impact.
10. Low-Impact Variation:
For individuals with joint concerns or those seeking a lower-impact option, a modification involves stepping out to the sides instead of jumping. This variation reduces impact while still providing cardiovascular benefits.
11. Incorporating into Workouts:
Jumping jacks can be incorporated into various workout routines. They are commonly used in warm-up sessions to prepare the body for more intense exercise or as a standalone cardiovascular activity.
12. Variations and Challenges:
To add variety and challenge, different variations of jumping jacks can be introduced. This includes side-to-side jacks, cross jacks, or incorporating them into circuit training. These variations target muscles from different angles, providing a more comprehensive workout.
:max_bytes(150000):strip_icc()/lactate-threshold-training-3120092-1585-f21d5aeeefc04a1abee769add6197318.jpg)
High Knees
1. Introduction to High Knees:
High Knees is a dynamic and high-impact exercise that targets the lower body, specifically the quadriceps, hamstrings, and hip flexors. This exercise is known for elevating the heart rate, improving cardiovascular fitness, and enhancing overall agility.
2. Starting Position:
Begin by standing with your feet hip-width apart. The starting position for High Knees involves keeping your arms at your sides and maintaining a straight posture.
3. Lifting the Knees:
In a brisk and controlled manner, start lifting your knees towards your chest, alternating between legs. The goal is to bring the knees as high as possible with each lift.
4. Arm Movement:
Simultaneously, swing your arms in a running motion. The coordination of arm and leg movements adds intensity to the exercise and engages the upper body, contributing to a full-body workout.
5. Engaging the Core:
High Knees require significant engagement of the core muscles to lift the knees and maintain balance. This constant activation of the core provides additional benefits for abdominal strength and stability.
6. Improving Cardiovascular Endurance:
One of the primary benefits of High Knees is its ability to rapidly increase the heart rate, leading to improved cardiovascular endurance. This makes it an effective exercise for those looking to enhance their aerobic fitness.
7. High-Impact Nature:
High Knees are a high-impact exercise, making them effective for burning calories and promoting weight loss. However, individuals with joint issues may need to exercise caution or consider low-impact alternatives.
8. Adaptable to Fitness Levels:
The intensity of High Knees can be adjusted to accommodate various fitness levels. Beginners may start at a slower pace with lower knee lifts, gradually increasing both speed and height as they become more comfortable.
9. Incorporating High Knees into Workouts:
High Knees can be incorporated into warm-up routines to prepare the body for more intense exercise or used as a standalone cardiovascular activity. They are often included in high-intensity interval training (HIIT) workouts for their calorie-burning and conditioning benefits.
10. Interval Training Potential:
High Knees are well-suited for interval training, where short bursts of high-intensity exercise are alternated with periods of rest or lower intensity. This type of training enhances metabolism and contributes to the afterburn effect, where the body continues to burn calories post-exercise.
11. Agility and Coordination:
The rapid knee lifts and coordinated arm movements in High Knees contribute to improved agility and coordination. This makes the exercise beneficial not only for cardiovascular fitness but also for overall motor skills.
12. Cool Down and Stretching:
After completing a session of High Knees, it's essential to engage in a cool-down routine that includes stretching. This helps to prevent muscle soreness, improves flexibility, and supports overall recovery. Stretching the quadriceps, hamstrings, and hip flexors is particularly beneficial after performing High Knees.
Burpees:
1. Introduction to Burpees:
Burpees are a full-body, high-intensity exercise that combines strength training and cardiovascular conditioning. This compound movement is often included in fitness routines due to its efficiency in working multiple muscle groups and elevating the heart rate.
2. Starting Position:
Begin in a standing position with feet shoulder-width apart. This is the starting position for a burpee.
3. Squatting Down:
Lower your body into a squatting position, placing your hands on the floor in front of you. This movement engages the lower body, activating the quadriceps, hamstrings, and glutes.
4. Jumping Back to Plank:
From the squat position, jump your feet back, landing in a plank position. This engages the core and works the muscles of the chest, shoulders, and triceps.
5. Chest to the Floor:
Optionally, perform a push-up by lowering your chest to the floor while maintaining a straight line from head to heels. This adds an upper-body strengthening element to the exercise.
6. Returning to Squat Position:
Jump your feet back towards your hands, returning to the squat position. This movement incorporates explosive power from the legs.
7. Explosive Jump:
From the squat position, explode upward into a vertical jump, reaching your arms overhead. This component of the burpee enhances cardiovascular conditioning and power.
8. Benefits of Burpees:
Burpees provide a full-body workout, targeting muscles in the legs, core, chest, shoulders, and arms. They are effective for burning calories, improving cardiovascular fitness, and building both strength and endurance.
9. High-Intensity Interval Training (HIIT):
Burpees are commonly used in High-Intensity Interval Training (HIIT) due to their ability to rapidly increase the heart rate. The intense bursts of activity followed by short rest periods contribute to improved fitness levels and fat burning.
10. Adaptability to Fitness Levels:
Burpees can be modified to accommodate various fitness levels. Beginners may perform a step-by-step version, omitting the push-up or reducing the intensity of the jumps, while advanced practitioners can add variations or increase the pace for an added challenge.
11. Time-Efficient Workout:
Due to their compound nature, burpees are a time-efficient exercise that delivers maximum results in a short period. They can be included in a workout routine for a quick and effective full-body conditioning session.
12. Precautions and Considerations:
While burpees offer numerous benefits, they are a high-impact exercise and may not be suitable for everyone, especially those with joint issues or certain health conditions. It's crucial to perform burpees with proper form to avoid injury, and individuals with specific concerns should consult with a fitness professional or healthcare provider before incorporating burpees into their routine.

Running in Place
1. Introduction to Running in Place:
Running in place is a simple yet effective aerobic exercise that mimics the motion of running while staying stationary. It's a versatile exercise suitable for various fitness levels and can be easily incorporated into warm-up routines, cardio workouts, or interval training.
2. Starting Position:
Begin in a standing position with feet hip-width apart. The starting position for running in place involves keeping the upper body upright, shoulders relaxed, and arms bent at a 90-degree angle.
3. Lifting the Knees:
Lift one knee at a time towards the chest, engaging the core and hip flexors. The movement replicates the knee lift of running, activating the lower body muscles.
4. Arm Movement:
Swing the arms in a coordinated motion as if you were running. This helps elevate the heart rate, engages the muscles of the upper body, and contributes to the overall cardiovascular benefits of the exercise.
5. Quick and Controlled Movements:
Perform the running motion at a pace that suits your fitness level. The goal is to maintain a quick and controlled rhythm, ensuring an effective cardiovascular workout.
6. Benefits of Running in Place:
Running in place offers numerous benefits, including improved cardiovascular endurance, calorie burning, and enhanced leg strength. It's a convenient and accessible exercise that requires minimal space and no special equipment.
7. Adaptability to Fitness Levels:
Running in place is adaptable to different fitness levels. Beginners can start with a slower pace and lower knee lifts, gradually increasing intensity as endurance improves. Advanced individuals may incorporate variations or use it as part of high-intensity interval training (HIIT) for added challenge.
8. Warming Up the Body:
Running in place is an excellent warm-up exercise, preparing the body for more intense physical activity. The dynamic movement increases blood flow to the muscles, raises body temperature, and improves joint flexibility.
9. Coordination and Balance:
The rhythmic nature of running in place enhances coordination and balance. The simultaneous movement of arms and legs challenges the body to maintain stability, contributing to overall motor skill improvement.
10. Incorporating into Workouts:
Running in place can be incorporated into various workout routines. It serves as a standalone cardiovascular exercise or can be combined with other movements to create a comprehensive and engaging workout session.
11. Interval Training Potential:
Running in place is well-suited for interval training, where short bursts of high-intensity exercise are alternated with periods of rest or lower intensity. This approach boosts metabolism, improves cardiovascular health, and can be a time-efficient way to achieve fitness goals.
12. Cooling Down and Stretching:
After completing a running in place session, it's essential to engage in a cool-down routine that includes stretching. This helps prevent muscle soreness, enhances flexibility, and supports overall recovery. Stretching the quadriceps, hamstrings, and calf muscles is particularly beneficial after running in place.
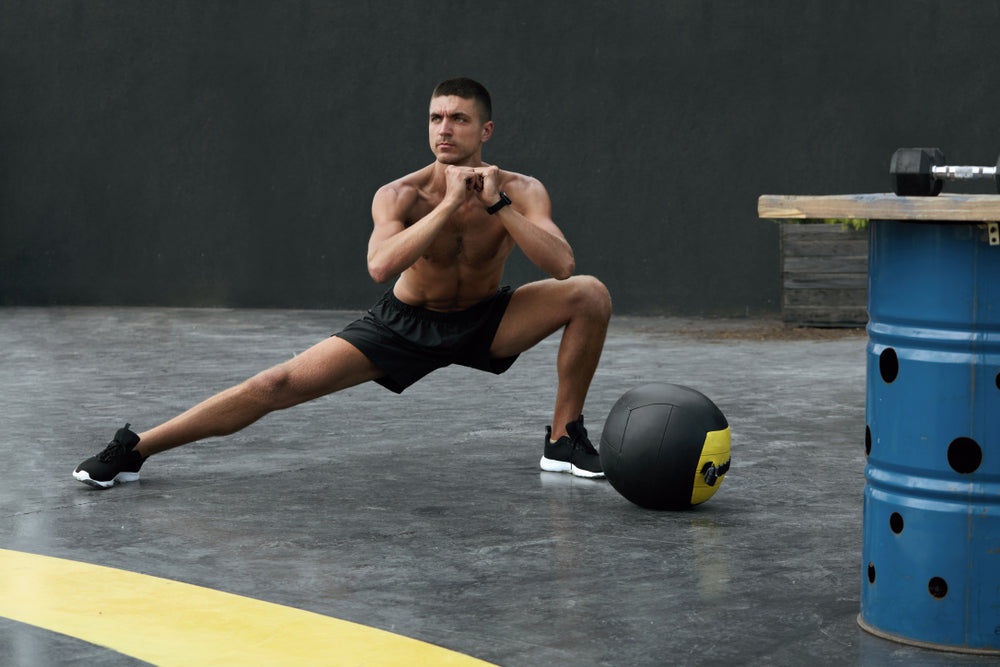
Side Lunges:
1. Introduction to Side Lunges:
Side lunges, also known as lateral lunges, are a versatile and effective lower body exercise that engages multiple muscle groups. This exercise involves a lateral stepping motion, providing a unique challenge to the inner and outer thighs, glutes, and hamstrings.
2. Starting Position:
Begin in an upright standing position with your feet shoulder-width apart. Keep your posture tall, shoulders relaxed, and core engaged. This is the starting position for side lunges.
3. Stepping to the Side:
Initiate the side lunge by taking a wide step to the right or left. Ensure that the stepping foot is firmly planted, and the toes are pointing forward. The opposite foot remains in the starting position.
4. Lowering into the Lunge:
As you step to the side, lower your body by bending the knee of the stepping leg. Aim to lower your hips back and down, keeping the opposite leg straight. This movement engages the muscles of the inner thigh and glutes.
5. Hip Hinge and Form:
Emphasize a hip hinge as you lower into the lunge to activate the glutes and hamstrings. Keep your chest lifted and your back straight to maintain proper spinal alignment. This position targets the posterior chain while also challenging your balance.
6. Inner Thigh Activation:
The lateral motion of side lunges provides a unique stimulus to the inner thighs, working the adductor muscles. This is particularly beneficial for individuals looking to strengthen and tone the inner thigh area.
7. Outer Thigh Engagement:
As you push off to return to the starting position, focus on engaging the outer thigh muscles. This dynamic movement targets the abductors, contributing to improved hip stability and overall leg strength.
8. Full Range of Motion:
Strive for a full range of motion in each side lunge. Lower your body until your thigh is approximately parallel to the ground. This ensures that you maximize the engagement of the targeted muscle groups.
9. Breathing and Tempo:
Coordinate your breathing with the movement. Inhale as you lower into the lunge, and exhale as you push off to return to the starting position. Maintain a controlled tempo to enhance muscle engagement and stability.
10. Benefits of Side Lunges:
Side lunges offer a range of benefits, including improved flexibility, enhanced lower body strength, and increased hip mobility. The exercise's versatility makes it suitable for individuals at various fitness levels.
11. Incorporating Variations:
To add variety to your workout routine, consider incorporating variations of side lunges. This can include lateral lunges with a torso twist or incorporating weights for added resistance.
12. Cool Down and Stretching:
After completing a set of side lunges, it's essential to include a cool-down session. Perform stretches that target the inner and outer thighs, hamstrings, and glutes to promote flexibility and reduce muscle tightness. Stretching can aid in recovery and improve overall flexibility over time.
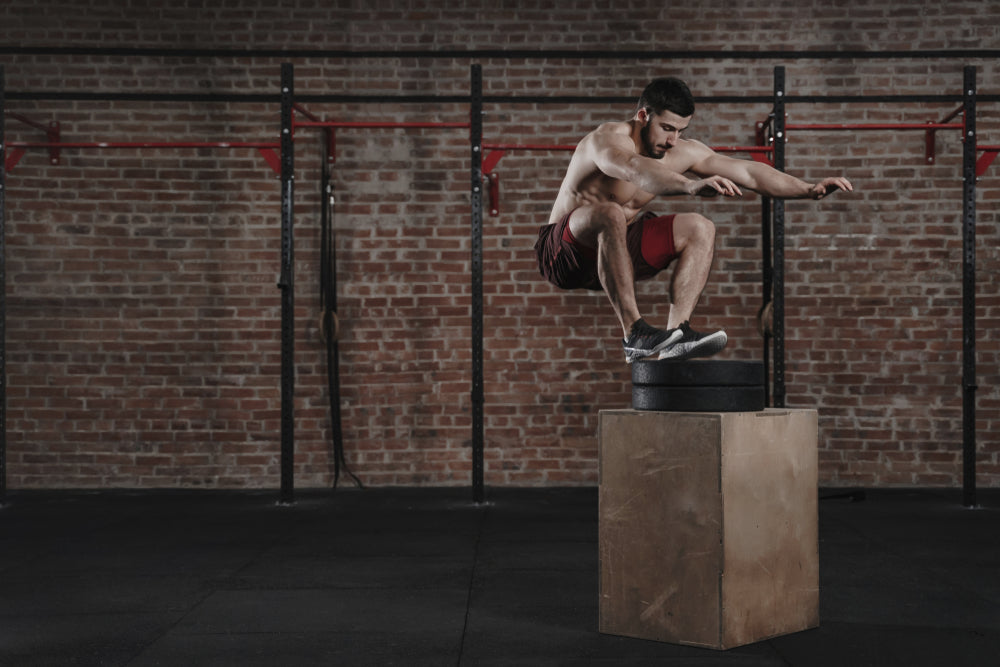
Box Jumps:
1. Introduction to Box Jumps:
Box jumps are a dynamic and explosive plyometric exercise that targets the lower body, primarily the muscles of the legs and glutes. This exercise involves jumping onto a raised platform, often a sturdy box, and is commonly used to improve power, strength, and athletic performance.
2. Starting Position:
Begin in a standing position facing the box, with your feet shoulder-width apart. This is the starting position for box jumps.
3. Joint Flexion:
Initiate the movement by flexing your hips and knees, lowering your body into a partial squat position. Keep your chest up, back straight, and engage your core for stability.
4. Explosive Jump:
Execute an explosive jump by extending your hips, knees, and ankles simultaneously. Swing your arms to generate momentum, and aim to jump onto the box with both feet leaving the ground at the same time.
5. Landing on the Box:
Land softly on the box, ensuring your entire foot is on the surface. Bend your knees upon landing to absorb the impact and promote joint safety. The goal is a controlled and stable landing.
6. Full Hip Extension:
Achieve a full hip extension when on top of the box by standing upright with your hips fully extended. This engages the glutes and emphasizes the power generated from the lower body.
7. Box Height and Difficulty:
The height of the box can vary based on fitness level and goals. Beginners may start with a lower box, gradually progressing to higher heights as strength and confidence increase.
8. Benefits of Box Jumps:
Box jumps offer numerous benefits, including increased leg strength, improved power, enhanced cardiovascular fitness, and heightened neuromuscular coordination. They are a time-efficient exercise that works multiple muscle groups simultaneously.
9. Plyometric Training:
Box jumps are a form of plyometric training, which involves rapid and explosive movements. Plyometrics improve the stretch-shortening cycle of muscles, contributing to increased power and athleticism.
10. Safety Considerations:
Prioritize safety when performing box jumps. Ensure the box is stable, placed on a non-slip surface, and your landing area is clear. Start with a height that allows for proper form, and only progress to higher levels when comfortable and proficient.
11. Incorporating Box Jumps into Workouts:
Box jumps can be included in various workout routines. They can be part of a lower body strength session, integrated into a high-intensity interval training (HIIT) workout, or used as a functional exercise in athletic training programs.
12. Cool Down and Recovery:
After completing a box jump session, engage in a cool-down routine that includes stretching and mobility exercises. Focus on the lower body muscles, including the hamstrings, quadriceps, and calves, to alleviate muscle tightness and promote flexibility.

Skater Jumps:
1. Introduction to Skater Jumps:
Skater jumps, also known as lateral jumps or side-to-side jumps, are a dynamic and functional exercise that targets the lower body and enhances cardiovascular fitness. This movement mimics the lateral motion of a skater, making it an effective exercise for improving agility, balance, and leg strength.
2. Starting Position:
Begin in a standing position with your feet shoulder-width apart. Keep your chest up, shoulders back, and core engaged. This is the starting position for skater jumps.
3. Lateral Leap:
Initiate the movement by leaping to the right, landing on your right foot while swinging your left leg behind you. Simultaneously, bring your left hand across your body and touch the outside of your right foot.
4. Engaging Leg Muscles:
Skater jumps engage the muscles of the legs, including the quadriceps, hamstrings, and glutes. The lateral leap activates these muscles in a unique way, promoting strength and stability.
5. Balance and Coordination:
Maintaining balance and coordination is crucial during skater jumps. The lateral movement challenges your ability to stabilize on one leg, enhancing proprioception and overall balance.
6. Exploding Back to Center:
After landing on one foot, explosively push off and leap to the left, landing on your left foot. Swing your right leg behind you and touch the outside of your left foot with your right hand.
7. Dynamic Arm Movement:
Skater jumps incorporate dynamic arm movements that mimic the natural motion of a skater. This coordinated movement adds intensity to the exercise and engages the muscles of the upper body.
8. Cardiovascular Benefits:
Skater jumps are a high-intensity exercise that elevates the heart rate, providing cardiovascular benefits. This makes them a valuable addition to interval training or cardio-focused workout routines.
9. Modifying Intensity:
Modify the intensity of skater jumps based on your fitness level. Beginners may start with smaller lateral leaps, gradually increasing the distance as strength and confidence improve.
10. Variations and Challenges:
To add variety and challenge, consider incorporating variations of skater jumps. This can include increasing the speed of the lateral leaps, adding a jump at the center, or incorporating directional changes.
11. Functional Fitness:
Skater jumps are considered a functional exercise as they replicate movements used in various sports and activities. This can contribute to improved performance in activities that involve lateral movements, such as skating or playing certain sports.
12. Cool Down and Stretching:
After completing a set of skater jumps, include a cool-down routine that focuses on stretching the muscles used during the exercise. Stretch the quadriceps, hamstrings, and calves to enhance flexibility and reduce muscle tightness.
Aerobic Step Exercises:
1. Introduction to Aerobic Step Exercises:
Aerobic step exercises involve using a platform or step bench to perform a variety of cardiovascular and strength-training movements. These exercises provide a versatile and effective workout, targeting different muscle groups while elevating the heart rate for improved cardiovascular fitness.
2. Choosing the Right Step:
Selecting the appropriate step height is crucial for safety and effectiveness. Beginners may start with a lower step height and gradually progress as they become more comfortable with the movements.
3. Basic Step-Up:
Begin with the fundamental step-up exercise. Step onto the platform with one foot, followed by the other, and then step back down. This simple movement engages the quadriceps, hamstrings, and calves.
4. Knee Lifts:
Incorporate knee lifts by stepping up onto the platform and lifting one knee toward the chest. This adds a dynamic element, engaging the core and improving balance.
5. Side Steps:
Perform side steps by stepping laterally onto the platform and back down. This targets the muscles of the inner and outer thighs, promoting leg strength and flexibility.
6. Grapevine:
The grapevine is a lateral stepping pattern that involves crossing one foot over the other. This dynamic movement enhances coordination and works the lower body muscles.
7. Jumping Exercises:
Progress to more advanced movements like jumping exercises. This can include jumping onto the platform and back down, incorporating plyometric elements to boost cardiovascular fitness and leg strength.
8. Arm Movements:
8. Arm Movements:
9. Interval Training:
Aerobic step exercises are conducive to interval training. Alternate between periods of higher intensity, such as faster stepping or adding jumps, and lower intensity, such as basic step-ups, for an effective cardiovascular workout.
10. Choreographed Routines:
Create choreographed routines by combining various step movements. This adds an element of fun and creativity to the workout, making it more engaging and motivating.
11. Core Engagement:
Many aerobic step exercises involve core engagement for stability. Movements like knee lifts, kicks, and side steps challenge the abdominal muscles, contributing to improved core strength.
12. Cool Down and Stretching:
Finish the aerobic step workout with a cool-down period. Perform stretches that target the major muscle groups, including the quadriceps, hamstrings, calves, and upper body, to enhance flexibility and reduce muscle tightness. Incorporating a cool-down helps prevent injury and promotes recovery.
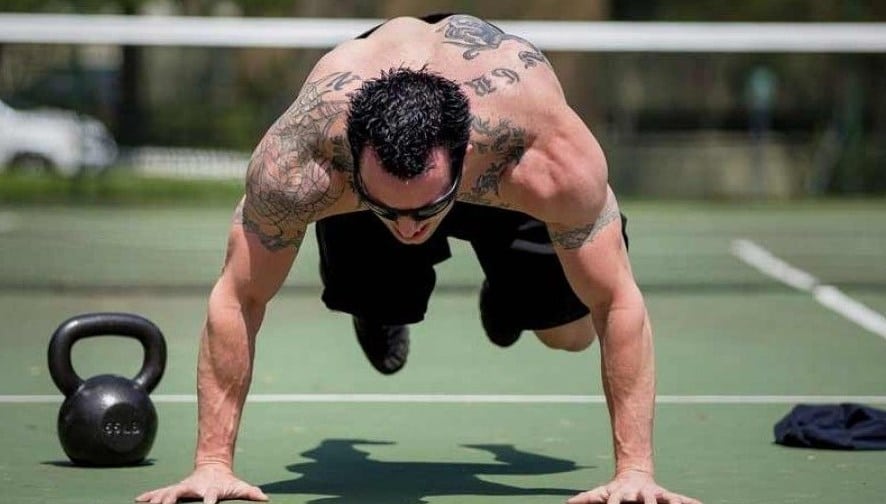
Mountain Climbers:
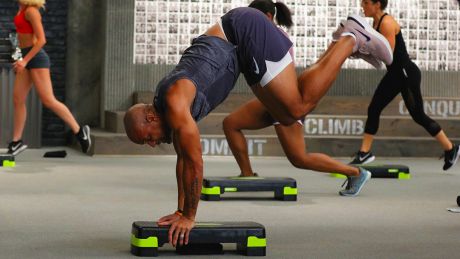
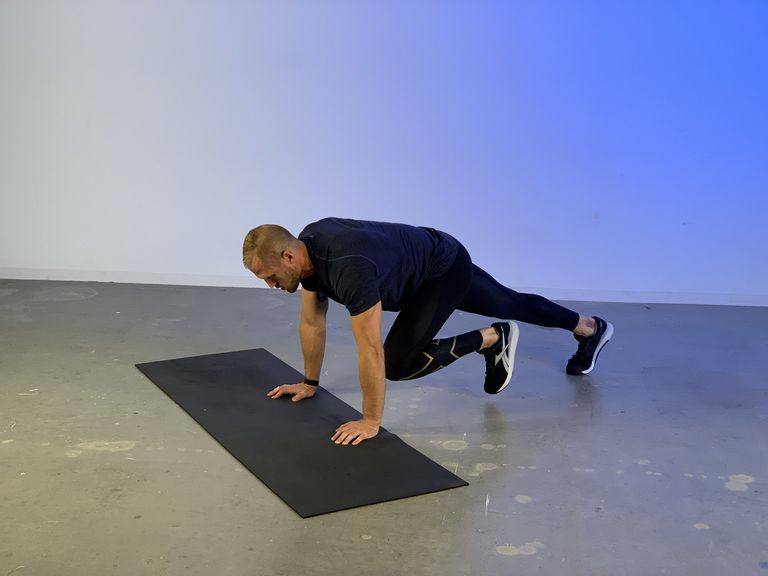
1. Introduction to Mountain Climbers:
Mountain climbers are a dynamic and full-body exercise that targets the core, shoulders, chest, and legs. This high-intensity movement mimics the action of climbing, providing cardiovascular benefits while engaging multiple muscle groups.
2. Starting Position:
Begin in a plank position with your hands directly under your shoulders and your body forming a straight line from head to heels. This is the starting position for mountain climbers.
3. Knee-to-Chest Movement:
Initiate the exercise by bringing your right knee toward your chest in a controlled manner. Maintain a strong plank position with your shoulders over your wrists.
4. Alternating Leg Movement:
As you return the right leg to the starting position, immediately bring the left knee toward your chest. The movement is continuous and resembles a running or climbing motion.
5. Core Engagement:
Mountain climbers are highly effective for core engagement. The constant movement of bringing the knees toward the chest requires abdominal activation, strengthening the rectus abdominis and obliques.
6. Cardiovascular Benefits:
Due to their dynamic nature, mountain climbers elevate the heart rate quickly, providing excellent cardiovascular benefits. This makes them a valuable addition to high-intensity interval training (HIIT) workouts.
7. Arm and Shoulder Engagement:
The plank position and constant movement of the legs engage the muscles of the arms and shoulders. This not only contributes to upper body strength but also enhances stability.
8. Modification for Intensity:
Beginners can modify mountain climbers by performing the exercise at a slower pace. As fitness levels increase, the speed can be intensified to challenge the cardiovascular system further.
9. Variation with Cross-Body Movement:
Add variety to mountain climbers by incorporating a cross-body movement. Bring the right knee toward the left elbow and vice versa. This variation targets the obliques and adds a rotational element.
10. Plyometric Mountain Climbers:
For an advanced version, consider incorporating plyometric mountain climbers. Instead of bringing the knees directly toward the chest, explosively switch legs, allowing the feet to leave the ground momentarily.
11. Time and Repetitions:
Mountain climbers can be performed for a set duration or a specific number of repetitions. Including them in a workout routine enhances calorie burn and overall metabolic rate.
12. Cool Down and Stretching:
After completing a set of mountain climbers, incorporate a cool-down routine. Stretch the muscles used during the exercise, focusing on the hip flexors, hamstrings, and calves, to promote flexibility and reduce muscle tightness. Stretching aids in recovery and flexibility enhancement.